

Taking a screenshot on a MacBook is incredibly easy once you know the right shortcuts. Whether you want to capture the entire screen, a specific window, or just a selected portion, macOS gives you multiple simple options.
In this guide, you’ll learn how to take a screenshot on MacBook step-by-step, plus tips for saving and editing your screenshots quickly.
How to Take a Screenshot on MacBook: 5 Easy Methods
1. Capture the Entire Screen
Shortcut:Command (⌘) + Shift + 3
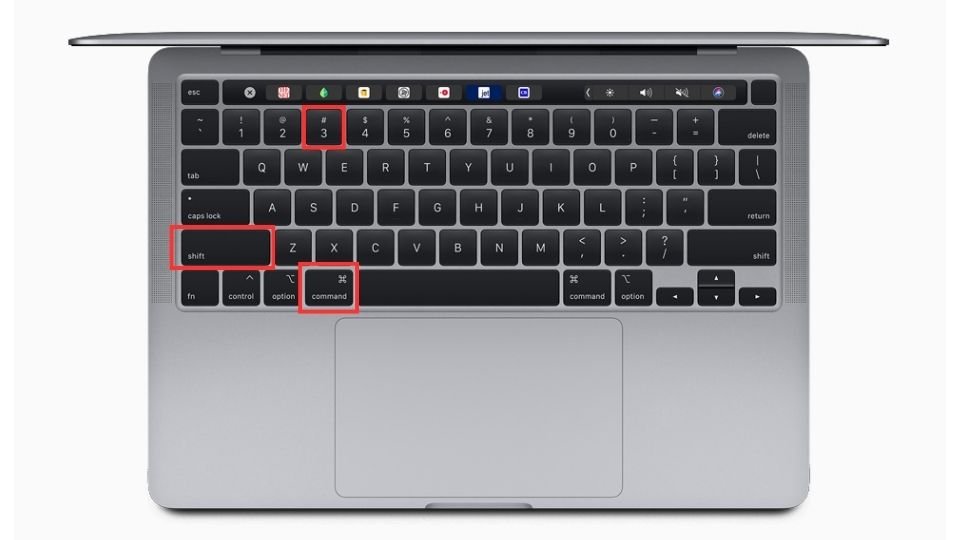
Steps:
- Press
Command (⌘) + Shift + 3together. - You’ll hear a camera shutter sound (if your sound is on).
- The screenshot will automatically save to your Desktop.
Pro Tip: If you have macOS Mojave or later, a thumbnail will appear in the bottom-right corner of your screen. You can click it to edit the screenshot immediately.
2. Capture a Selected Portion of the Screen
Shortcut:Command (⌘) + Shift + 4

Steps:
- Press
Command (⌘) + Shift + 4. - Your cursor will change to a crosshair.
- Click and drag to select the area you want to capture.
- Release the mouse or trackpad button to take the screenshot.
3. Capture a Specific Window or Menu
Shortcut:Command (⌘) + Shift + 4, then Spacebar


Steps:
- Press
Command (⌘) + Shift + 4. - Press the
Spacebar. The cursor will change to a camera icon. - Hover over the window or menu you want to capture.
- Click to take the screenshot.
4. Use the Screenshot Toolbar (for More Options)

Shortcut:
Command (⌘) + Shift + 5
Steps:
Press
Command (⌘) + Shift + 5.A toolbar will appear at the bottom of your screen.
You can choose to:
Capture the entire screen
Capture a selected window
Capture a selected portion
Record the entire screen (video)
Record a selected portion of the screen (video)
This is the most flexible way to take a screenshot on MacBook.

5. Capture the Touch Bar (If Your MacBook Has One)
Shortcut:Command (⌘) + Shift + 6

Steps:
- Press
Command (⌘) + Shift + 6. - This will capture exactly what’s displayed on your Touch Bar.
Where Are Screenshots Saved on MacBook?
By default, screenshots are saved to your Desktop.
They are automatically named like this:
Screenshot [date] at [time].png
You can also change the default save location:
- Press
Command (⌘) + Shift + 5to open the Screenshot Toolbar. - Click Options and select where you want to save your screenshots (like Documents, Clipboard, Mail, Messages, or Preview).
How to Edit Screenshots Quickly on Mac
When you take a screenshot, a small thumbnail will pop up in the bottom-right corner.

- Click the thumbnail to open editing options.
- You can crop, highlight, draw, or add text immediately.
- After editing, you can save or share directly from the edit window.
If the thumbnail disappears before you click it, you can also edit screenshots later using the Preview app.
Common Screenshot Problems on MacBook (And How to Fix Them)
- Shortcut not working?
Make sure your keyboard is working properly. Also, check if shortcuts are enabled under System Settings > Keyboard > Shortcuts. - Screenshots not saving?
Check your storage space and permissions for Desktop or selected folders. - Want higher-quality screenshots?
Mac screenshots are already high-resolution, but avoid zooming in too much after capturing.
Final Thoughts
Knowing how to take a screenshot on MacBook is one of the most useful skills for productivity.
Whether you’re saving receipts, creating a tutorial, or simply capturing a funny meme, macOS makes the process quick and easy.
Master these Mac screenshot shortcuts and you’ll capture exactly what you need — fast and professionally!
1 thought on “How to Take a Screenshot on MacBook: Complete Guide (2025)”